

Membership Part -1 : Create and Customize Powerful Plans
How to Create Memberships in the Wajooba Admin (Part 1)
Overview
Ready to build recurring revenue and a thriving community? This guide walks you through setting up a membership, adding plans and giving each plan its pricing. You're just a few simple steps away from welcoming new members! ✨
This is Part 1. When your plans are ready, continue with How to Publish and Manage Memberships in the Wajooba Admin (Part 2) to put them on your website and manage your members.
In this guide you will:
| Stage | What you'll do |
|---|---|
| Turn on Memberships | Switch on the Memberships module in Settings |
| Memberships | Describe your membership and let AI set up the rest, its billing options and trial |
| Plans | Add a plan with its features, bonus features, Recommended badge and header color |
| Pricing | Add a price for each billing cycle, with optional extras such as Was Price and Registration Fees |
Prerequisites
- Access to the Wajooba Admin
- The Memberships module turned on (see Step 1)
- A clear idea of your membership offerings and pricing strategy
- Your plan names, features and any bonus features you'd like to offer
Steps
Step 1: Turn On the Memberships Module
If you don't see Memberships under Sales in the menu, switch the module on first.
- Go to Admin > Settings and click Module Settings.
- Under MANAGE MODULES, turn on the Memberships toggle.
- Memberships now appears in the menu under Sales.
![Module Settings with the Memberships toggle under MANAGE MODULES]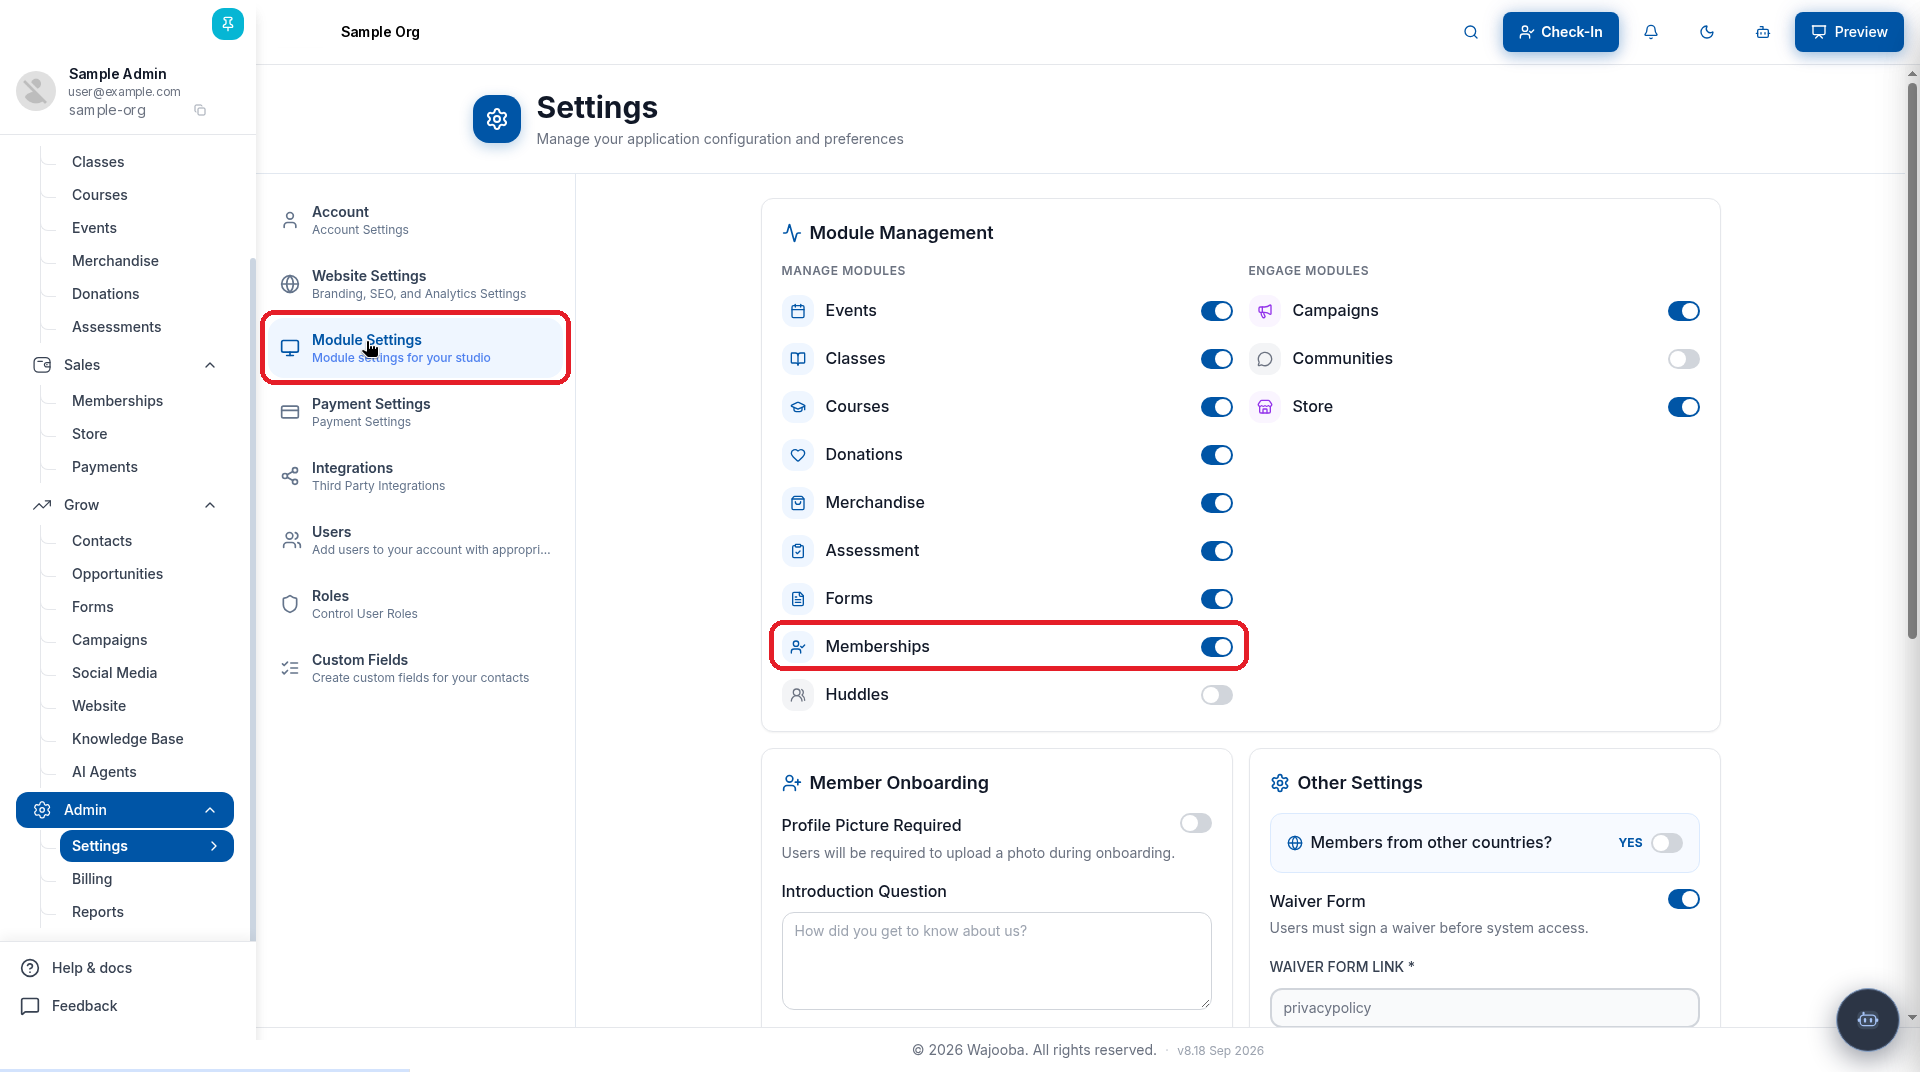
Step 2: Describe Your Membership
A membership is the umbrella for all your plans (for example, "Mastermind Community" or "Monthly Coaching"). AI helps you set it up.
- Go to Sales > Memberships.
- In the banner ("Describe your membership offering and let AI build the membership…"), type a name or short description of your membership in the prompt box. For example: "Sample Membership".
- Not sure what to write? Try a suggestion chip, such as Meditation membership, Fitness plan or Coaching program.
- Click Generate. AI drafts your membership for you.
![The Memberships page with the AI prompt box and suggestion chips]
Below the banner you can Search memberships... to find a membership you've already created.
Step 3: Review the Membership's Billing Options and Trial
AI opens the new membership's form, already filled in. Take a moment to review it.
- Check the billing cycles you'd like to offer: Weekly ("Billed every week"), Monthly ("Most popular"), Quarterly ("Every 3 months") or Yearly. Selected cycles show a tick.
- Set the Trial Period (Days). Set it to 0 if you don't want to offer a free trial.
- Edit the Trial Message. This message is shown to customers on the checkout page.
- Look through the Suggested Plans for inspiration, such as Starter and Pro. These plans will be available to create after you save the membership.
- When everything looks good, click Submit to save the membership.
![The membership form with billing cycles, Trial Period (Days), Trial Message and Suggested Plans]
Your membership opens on its own page with the Plans, Members and Check-ins tabs. The Plans tab shows your TRIAL OFFER (such as "7 Days Free Trial"), your Membership Pricing cycles (such as Monthly and Yearly) and a Products card. To include a course or event in the membership, associate it with the membership from that course or event's pricing tab. Click Edit Membership if you'd like to change the membership's details.
![The Sample Membership page with the trial offer, Membership Pricing and Add Plan] You're doing great!
Step 4: Add a Plan
Now craft the plans your members can choose from, such as "Gold", "Silver" or "VIP Access".
- On the membership's Plans tab, scroll to Plans ("Manage your membership plans and their features.") and click + Add Plan.
- A new plan card opens. Type the plan's name (such as "Sample Plan") and a short description that highlights its value.
- Add a highlight line under the header, such as "Savings: $120 per year".
- Under INCLUDES:, list the plan's key features. Each feature has a title and a short description. Click + Add Feature to add another.
![A new plan card with the name, description, highlight line and features]
- Under BONUS FEATURES, click + Add Bonus to add extras that make your plan irresistible, such as "Bonus Workshop". ✨
- Want to guide members to your best offer? Turn on Recommended. The card then shows a RECOMMENDED badge.
- Pick a HEADER COLOR to keep the plan on brand.
- Click Create Plan.
![Bonus features, the Recommended toggle, Header Color and Create Plan]
💡 Tick Show Archived next to + Add Plan to see plans you've archived.
Step 5: Add Pricing to Your Plan
This is where your value meets an attractive price!
- On the plan card, under PRICING, find the billing cycle you want (such as MONTHLY or YEARLY) and click + Add. The Add Pricing window opens, showing the plan and cycle (for example "Sample Plan · Monthly").
- Enter the Amount. This is required.
- Optional: enter a Was Price. This original price is shown with a strikethrough, so your discount is easy to see.
- Optional: enter Registration Fees.
- Intro offer gives a discounted price for the first few billing periods, then the regular price. Heads-up: an intro offer can't be combined with a free trial. To use an intro offer, remove the trial from the membership first.
![The Add Pricing window with Amount, Was Price, Registration Fees and Intro offer]
- Choose a Session Limit, which caps how many classes or sessions a member can attend per billing period:
- Unlimited sessions: the member can attend without any session cap.
- Limited sessions: set the maximum visits included in each billing period. The allowance resets when the membership renews.
- Choose a Membership Duration:
- Fixed duration: set a specific membership validity period.
- Renews with subscription: the membership stays active as long as the subscription is active.
- Click Create Pricing.
![Session Limit, Membership Duration and Create Pricing]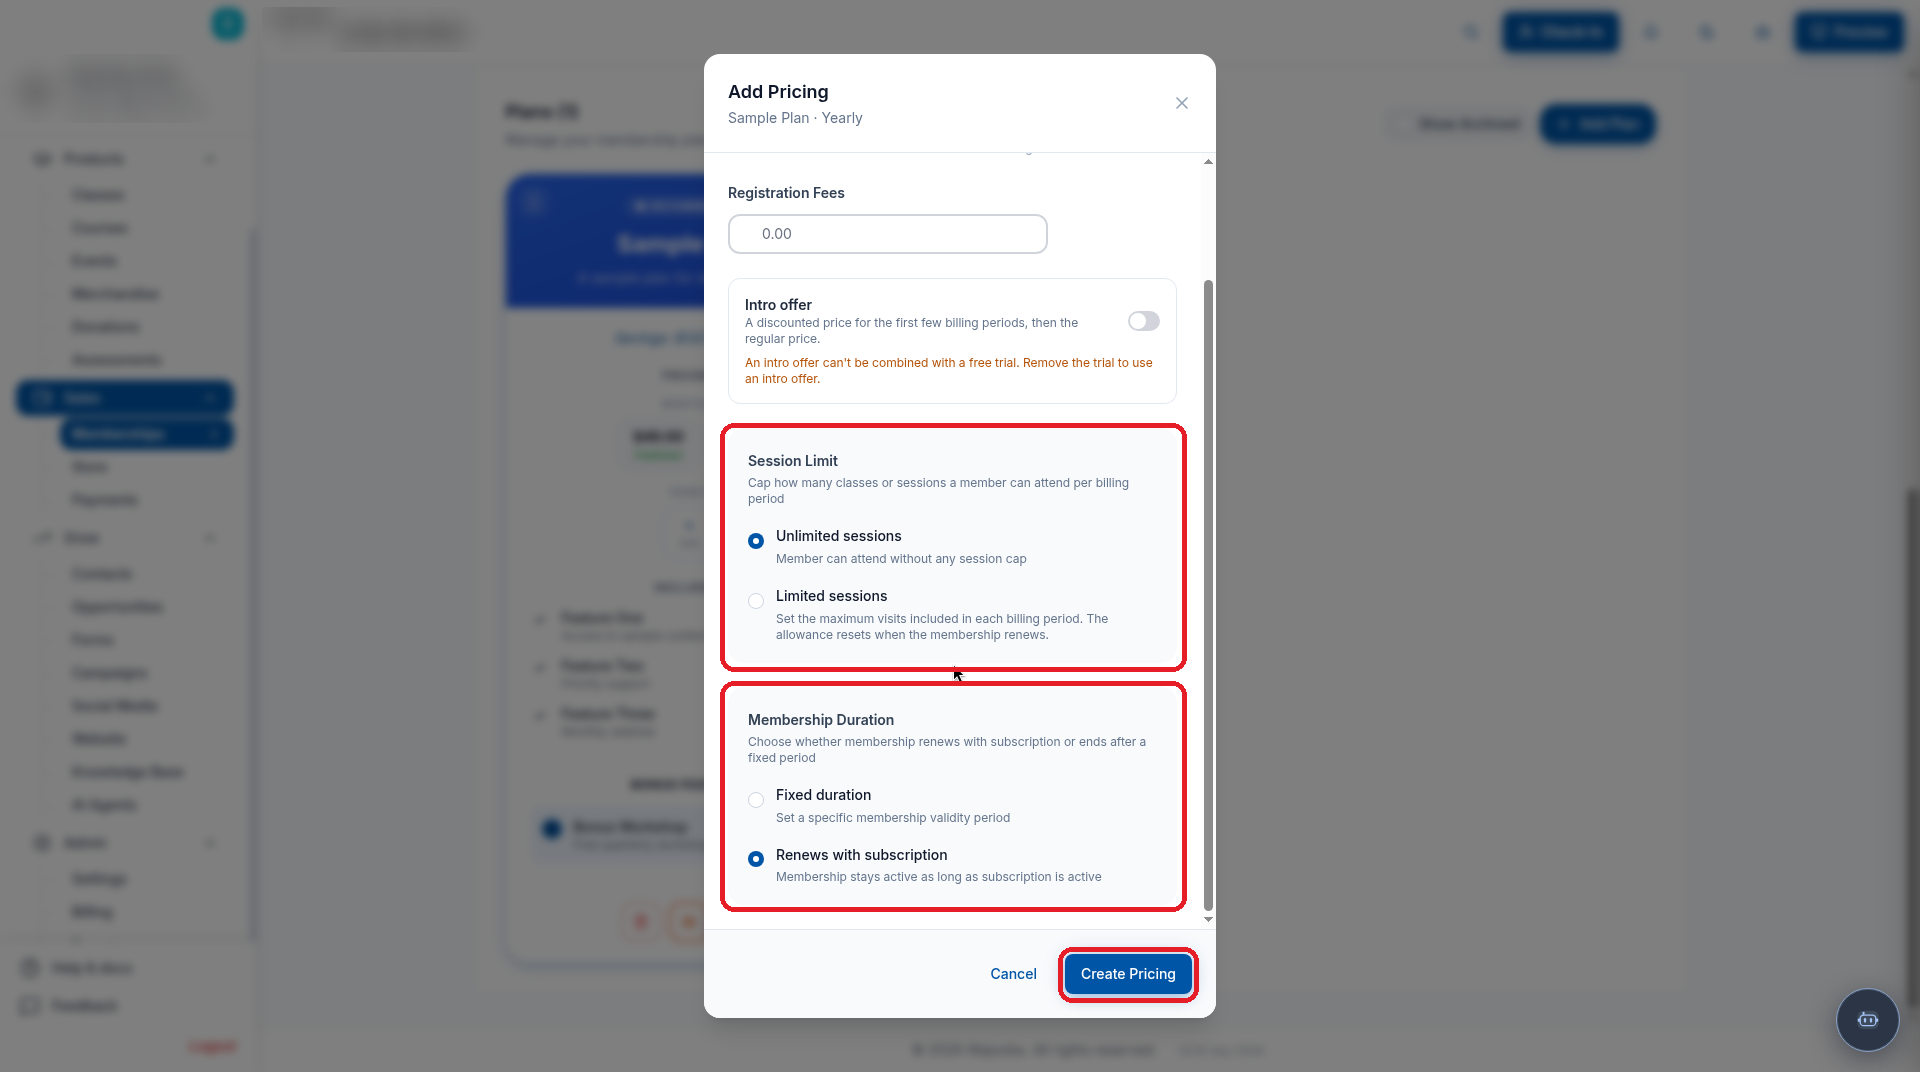
Your price now shows on the plan card, such as $49.00 under MONTHLY, marked Published. Each cycle keeps a + Add slot, so you can add more than one pricing option to a plan.
![The plan card showing $49.00 Published under Monthly, with Add slots]
Wonderful! Your membership, plan and pricing are ready.
Tips & Best Practices
- Know your value: list the outcomes and features that matter most to your members, and use BONUS FEATURES for extras.
- Start simple: begin with one or two plans and one billing cycle. You can add more pricing options later.
- Communicate clearly: use plan names and descriptions your members understand at a glance.
- Guide the choice: turn on Recommended for the plan you'd most like members to pick.
- Show the deal: use Was Price to show the original price with a strikethrough.
- Test and iterate: review your plans after launch and adjust pricing or features based on what your members choose.
Troubleshooting
| Problem | What to do |
|---|---|
| I can't find Memberships in the menu | Go to Admin > Settings > Module Settings and turn on Memberships under MANAGE MODULES. |
| My plan isn't showing | Check that you clicked Create Plan, and tick Show Archived in case the plan was archived. |
| My pricing isn't showing on the plan | Make sure you clicked Create Pricing. The price then appears under its billing cycle on the plan card. |
| I can't turn on the Intro offer | An intro offer can't be combined with a free trial. Remove the trial from the membership to use an intro offer. |
| I need to change the membership's details | Open the membership and click Edit Membership. |
Frequently Asked Questions
What's the difference between a membership, a plan and pricing?
A membership is the umbrella (for example, "Sample Membership"). Inside it, each plan is a tier with its own features, like Silver, Gold or Platinum. Pricing is what each plan costs for each billing cycle, such as $49 Monthly or $490 Yearly.
Should I create one membership or several?
Create one membership per offering, such as one for coaching and one for studio classes. Put the tiers of that offering as plans inside the same membership, so customers can compare them side by side.
Can one plan have both monthly and yearly pricing?
Yes. Each plan card shows a slot for every billing cycle you picked for the membership. Click Add under each cycle to set its price.
How do I show a discount on my price?
Enter the original price in Was Price when you add pricing. Make sure it's higher than the Amount, so customers see the original price struck through next to the lower one.
Should I use a free trial or an intro offer?
Use a free trial to let people try before they pay anything. Use an Intro offer to charge a lower price for the first few billing periods. You can't use both on the same plan, so pick the one that suits your goal.
When should I limit sessions?
Use Limited sessions for plans like "8 classes a month", where a member gets a set number of visits each billing period. The allowance resets when the membership renews. Use Unlimited sessions for all-access plans.
When should I use Fixed duration instead of Renews with subscription?
Use Fixed duration for programs with an end date, like a 3-month bootcamp. Use Renews with subscription for ongoing memberships that stay active as long as the member keeps paying.
What does the Recommended badge do?
Turning on Recommended highlights that plan with a badge, guiding customers toward the option you want most people to choose.
What's Next
Fantastic work! Your membership is set up. Next, follow How to Publish and Manage Memberships in the Wajooba Admin (Part 2) to publish your plans, add them to a page on your website and manage your members. Then spread the word on social media and to your email list, think about a welcome email sequence for new members, and keep engaging your community!
Learn More
- How to Price Your Online Course or Membership
- Building a Thriving Membership Community
- The Ultimate Guide to Membership Site Best Practices
Related Articles
- Setting Up Your First Online Course
- Creating Engaging Content for Your Community
- Building an Email List for Your Business
Want to manage your memberships by chatting with AI? Connect Wajooba's MCP server to Claude or Grok Bot
Was this article helpful?
Related articles
Still need help?
Can't find what you're looking for? Our team is happy to help.